Guide for defeating the ancient threshers in the age of the Shadow of Antiquity event in the hunt for relics in update 2.2 for Genshin impact.

Shadow of Antiquity in Genshin Impact - this is an event with a series of research and tests, during which you need to help find an ancient relic. The multi-stage event includes a variety of activities, each of which will bring valuable rewards to the player.
The following is a detailed guide to the Shadow of Antiquity in Genshin Impact. Use our instructions to easily complete all the tasks assigned to travelers in this event.
Event dates
Event Shadow of Antiquity in Genshin Impact started November 5 2021 years and ends November 15th. Within three days from the moment the event ends, it will still be possible to complete the quest “Autonomous source of mechanical energy. Conclusion".
Conditions of participation
The event Shadow of Antiquity will become available after the player receives 30th Adventure Rank and implementation tasks of the Archons "Unchanging God and Eternal Utopia", namely his part "A Flower Blooms in a Prison".
How to play Shadow of Antiquity in Genshin Impact
During the age of the Shadow of Antiquity in Genshin Impact, you will have to cope with tasks in three stages.
- At the 1st stage, you need to get Ayesha's Chaos Prospector by completing the starting task.

- At the 2nd stage, go to the sampling point. Charge Pursina's spikes with elemental attacks while fending off nearby enemies.

- In Stage 3, charge Pursina's Spikes within the time limit and defeat the Anomalous Ruin Grader Model.

Walkthrough Shadow of Ancient in Genshin Impact
Katerina of the Adventurer's Guild has yet another problem completing certain errands.
age of the quest Journey to Tsurumi
After talking to Katerina, head south to Tsurumi towards the large arena to fight the Ruin Grader. It's impossible to defeat him. When the mechanism is fully restored from the damage received, Paimon will say that you need to report what is happening to Katherine.

The guild secretary will direct the Traveler to the scientist Husseni, known for the event Gain Disc. After talking with him, the quest will end, and the player will receive Ayesha Chaos Prospector, x2 Hero XP, and 20000 Morata.
Video walkthrough
Phase 1 Preliminary study
Obtain Ayesha's Chaos Prospector by completing the Journey to Tsurumi starter quest. Equip the new tool through inventory. Press Z (default) to use the device. Go to a special place to find general purpose directional conduction components.

After placing the Chaos Prospector on the terrain, it will automatically start scanning it. When a search object is found, it will indicate its location, or direct the player to an approximate area where the component is definitely located.

Up to 3 Chaos Prospectors can be installed at the same time. If you try to use the 4th one, the one that was installed first will disappear.
Where to find general purpose directional conduction components
Head to the marked search areas to use Ayesha's Chaos Prospector there and do research. During each exploration in the 4 zones, players can:
- dig up a treasure chest;
- provoke an attack by monsters;
- find an ancient non-working device needed for the next stages of the event;
- assemble a general purpose directional conduction component.
Stormterror Lair
Hilichurls will be the opponents, and the reward of the test will be 40 Source Stones and 2 Directions of Freedom.
 Below is a fragment of a map of the area indicating the research points that are available in this zone.

Video walkthrough
Yaoguang Shoal
At the search point, you need to defeat the Guardian of the Ruins, receiving 40 Source Stones and 2 Instructions for Resistance for the test.
 Below is a fragment of a map of the area indicating the research points that are available in this zone.

Video walkthrough
Qingxu Lake
Here the player is waiting for another Guardian of the Ruins and a reward - 40 Source Stones and 2 Instructions about the Tales.
 Below is a fragment of a map of the area indicating the research points that are available in this zone.

Video walkthrough

Tatarasuna
On the Inazuma island, you will again have to fight the Hilichurls to get 40 Source Stones and 30 Morata.
 Below is a fragment of a map of the area indicating the research points that are available in this zone.

Video walkthrough
Phase 2 Sample Collection
After arriving at the sampling point, activate and recharge Pursina's spikes with Electro attacks.
After activation, you also need to charge the spikes with Electro energy. If this is not done, then the charge will gradually decrease. When the value reaches zero, the accumulation of charge will stop altogether.

In the course of loading the spikes, monsters will actively attack them. It is necessary to protect devices from destruction.
To start the stage, simply talk to Husseni about the research done at the starting 4 points. Sampling zones will become available, in which devices found but not working at the first stage will be activated. Start the challenge by attacking Pursina's spikes with Electro Strikes, then keep them charged by destroying the attacking enemies. There is a separate video walkthrough for each zone.
Stormterror Lair

It is highly recommended that you start the challenge with Electro characters in the squad to quickly load Pursina's spikes. To destroy enemy units (there will be two of them), Anemo heroes with zip ties, or fighters with huge AoE damage, are best suited. For completing the challenge, the player will receive 40 Source Stones and 2 Prosperity Directions.
Video walkthrough
Yaoguang Shoal

The principle is similar to the challenge in the Stormterror lair. Powerful elemental reactions will allow you to quickly destroy groups of enemies. For completing the test, the player will receive 40 Source Stones and 2 Directions of Zeal.
Video walkthrough
Lake Qingxu

Use Cryo characters, because. the site of action is the coastal zone. One of Pursina's spikes is as close to water as possible, allowing her to freeze enemies. In order to avoid AoE damage by electricity, use a hero with a powerful shield during the battle. For completing the challenge, the player will receive 40 Source Stones and 2 Gold Directions.
Video walkthrough

Tatarasuna

In Tatarasun, the sampling area is also located near the water, so Cryo-characters will help in the battle. Against enemies, it is best to use physical damage in combination with the Superconductor, Freeze and Shatter reactions. For completing the challenge, the player will receive 40 Source Stones and 30000 Pestilence.
Video walkthrough

dragon backbone
There is a small grotto (cave) in the specified area. Here you need to use the Chaos Prospector to find the Trial Monument. It is also worth activating the torches left after solving the puzzle. You will need a Pyro Hero to speed up the process. For ing the player will receive 6 magic ore of strengthening and 30000 Pestilence.

Guyun stone forest
Use the Prospector again in the indicated area. Be sure to have a Hydro-character in the squad, which will quickly destroy the shields of the Pyro-Mages of the Abyss. It will also be effective to use the Anemo-hero, which will pull the enemies. For ing, they also give out 6 magic gain ore and 30000 Pestilence.

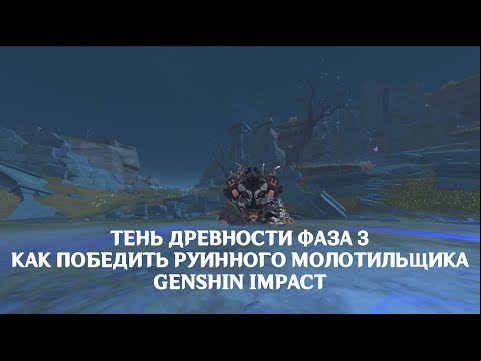
Phase 3 Practice Test
Speak with Husseni to start the "Autonomous Source of Mechanical Power" walkthrough. Living sample. Head to the arena with the currently unavailable Ruin Grader to find 3 Pursina Spikes with the Chaos Prospector (the tool hasn't changed how it works). Then talk to Husseni again. The fight with the main boss of the event will become available. During the test, you need to fulfill a number of conditions in order to receive valuable rewards.
How to kill a Ruin Grader
Go to Tsurumi's indicated location to complete the test. While charging the spikes, a special model of the Ruin Grader will appear. You can turn it off only by fully charging all the spikes.
This enemy has the following features:
- In the initial phase of the fight, his cores on his head and legs are open, allowing him to attack them to stop the movement of the mechanoid.
- After upgrading at least two spikes, the characteristics of the monster will improve.
- If you destroy the thresher before disconnecting from the power source, the recovery mode will work and the monster will return to the active phase of the battle again.
- At certain points in the battle, the thresher buff can be triggered. He not only attacks more actively, but also becomes invulnerable to attacks on weak spots (cores).
Who to take to the squad
We strongly recommend, in addition to your best DPS, to have during the battle:
- a good Electro, able to quickly activate the charging of Pursina's spikes;
- heroes that give the Freeze reaction (if possible);
- an archer who will be more effective than others in attacking the weak points of the thresher.
After defeating the anomalous model of the ruin thresher in the 3rd stage, the player will receive the final quest "Autonomous source of mechanical energy. Conclusion” with a number of additional awards.
It is not necessary to kill the thresher at all. For the sake of the source stones, it is enough to hit the cores on the head and legs, as well as monitor the loading of all three Pursina spikes. You can take the test multiple times. After its completion, the activator will appear in just a few seconds.
Video walkthrough
Walkthrough Autonomous source of mechanical energy Conclusion
This is the final quest of the Shadow of Antiquity event, available from 15 to 18 November 2021 provided that the player completes all Starter Challenges and defeats the Anomalous Ruin Grader. Travel to Rito Island for the final dialogue with scientist Husseni. For that the player will receive 10000 Mora and 4 Adventurer XP.
Awards
For completing all tasks, the player will receive:
- source stones;
- materials for leveling talents;
- Moru;
- magical ore to enhance weapons.

More Genshin Impact guides can be found on the website. Write in the comments if any test fails. Authors and other readers will help with advice on gathering a squad and battle tactics.
and in t mode it is impossible to ...?
I don't think so (but we haven't checked). Maybe someone else will chime in
One can
And what are the foundations of the Trials located on the territory of the task? That is, bedside tables on which there is usually a test badge. But they are empty and they write until it works, come back later
These devices will obviously work at the 2nd stage of the event, which is what we said in the article before the search zone maps.
Can you describe stage 1 in more detail, I’ve been walking for 2 hours and I can’t find this fragment.
Look, when you put the sufferer of chaos, light comes from him, in that direction you need to go and put w (so until you find it). I hope I explained clearly.