
The ever-moving picture: The sacred call to Holy call of the seven. Arrange the gears in the correct sequence and restore the picture to make the mechanism work.
In this guide, we will tell you how to complete the Ever-Moving Painting: Sacred Call event and move the gears correctly to restore the paintings.
How to start an event
Event starts 25 May в 12:00 by Moscow time (on the server Europe) and ends 12 June в 05:59. All in it 8 stages, which are likely to open two every 2 days. To start solving puzzles, you need to fulfill the following conditions:
- reach 32 adventure rank;
- complete the taskRitou Escape Plan";
- finish the questBattlefield of dice, cards and cats».
- complete the introductory task of the event Duel! To the heights of card skill.
Among the optional conditions of the Archons quest "Reflections on frailty". To skip them and start going through the stages, use the function Quick start in the event menu.
age of the quest The ever-moving picture: Sacred call

After completing the introductory taskThe duel begins! First suspicions» The game will automatically redirect you to the main menu of the event, where you can select the appropriate tab with the event. From there, you can proceed to the quest, which will give access to the age of the Ever-Moving Picture.
Start tracking the target to find Felix Yoga from Fontaine. A man stands among one of the tents at the top of the Mondstadt. Talk to the inventor - he will tell you that the local Adventurer's Guild personally sent him an invitation to create paintings based on the design of the cards. Some copies are already ready, so Felix offers to collect them.
Guide on how to restore the details of the mechanical picture in Genshin Impact
The mini-game requires you to restore eight mechanical paintings filled with many details. There is no time limit, but if the puzzle cannot be solved, then after a certain time, access to tooltipwhere the end result is shown.

Use of gears

To put the gear in place, you first need to select the part of the picture on which you want to place the mechanism. After that, select the desired gear and click on it to see if it starts spinning.

To complete the task, you need to adjust the gears so that they work smoothly together with each other. If, when solving a puzzle, there may be gears that come into conflict with other mechanisms and plates, then they do not fit in that place in size.
Move parts of the mechanical picture

Keep in mind that it is important to interact not only with mechanisms, but with the surfaces on which they are placed. In the mini-game, there is an opportunity to swap parts of the picture in places or rotate them clockwise.
 However, some of the surfaces are not available to change their position. In this case, it is worth paying attention to those plates that are docked with a fixed one in order to adapt to it.
 Also note that the progress of solving the puzzle is not saved when you exit the game while restoring a part or assembling a painting. If you interrupt the process of solving the problem, you will have to start over.
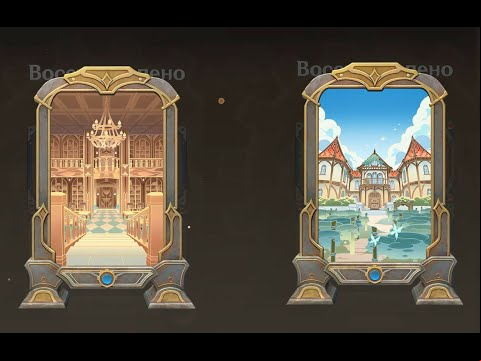
The ever-moving painting: Mondstadt 1

Approach the first booth located to the left of Felix the Yogi to start a mini-game. A feature of the stage is the function of changing the surface, which will bring the inventor's picture back to its original form. It is this mechanic that will be used to solve the puzzle.
To assemble the first mechanical painting, interact with surfaces and columns in the following way (numbers on the screenshots show the order of actions):
- Surface I. Swap the top plates - they are marked with Roman numerals. To do this, first click on the "Change surface" button, and then click on the second plate without details so that the picture takes the correct position. If you do everything right, the green gear will be on the right side.

- Surface II. This part must be skipped, since the surfaces have already taken the correct position.
- Column with gears 1. Put in the first position middle detailto connect with the green gear at the top of the image.
- Column with gears 2. Place another one on the second position middle detailso that it meshes with the blue gear at the bottom of the picture.
- Column with gears 3. The third position should remain empty, so just skip it and move on to the next column.
- Column with gears 4. For the fourth position, select great detailso that it connects both parts of the picture and sets the mechanism in motion.


After installing the last gear, the test will end.
If you have any problems with the collection of the picture, you can watch the process on the video:
The map is hidden behind the mechanism Ordo Favonius Libraries.

The ever-moving painting: Mondstadt 2

Approach the second booth to the right of the inventor and start the next stage. As in the previous case, it is required to interact with surfaces. Next, we will show what steps you need to perform in order to assemble the Mondstadt 2 painting.
- Surface I. Click on Change Surface, making the selected squares active. Then click on the second plate with the green gear (bottom) so that both surfaces change their position. Thus, 2 green parts will be on top, and blue on the bottom.
- Surface II. The painting has already been restored to its original state, so there is no need to interact with Surface 2. You can immediately go to the next step and start placing the details.
- Column with gears 1. Set to first position middle detail - this will connect the lower surfaces.
- Column with gears 2. For the second column choose great detail, which will connect 2 gears and set the entire bottom row in motion thanks to the blue part.
- Column with gears 3. Put one more in the third position great detailso that it combines the 2 green gears at the top and the part from the first column.


After that, all mechanisms will begin to interact with each other.
Video solution:
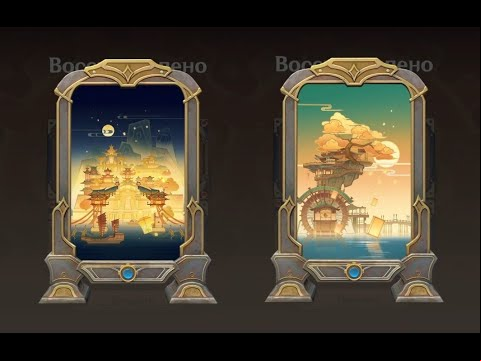
The card was used as a prototype of the mechanism. Distillery "Rassvet".

The ever-moving painting: Li Yue 1
Accept the task through the main menu of the event and go to Li Yue Harborto proceed to the next step. Paintings depicting the Dendro Kingdom are located on the pier in the northern part of the city. Approach the first stand and interact with it to activate the challenge. 
This time, in addition to moving the squares, mechanics with rotation are added. Next, let's look at how to interact with surfaces and columns in order to assemble Li Yue's painting 1:
- Surface I. You need to change the position of the blue gear. For this rotate the surface 3 times - the part must be between the empty column and the big yellow gear. The correct position is shown in the second screenshot.
- Surface II. Similarly rotate the surface 3 timesso that the columns numbered "3" and "4" stand upright and move to the left side of the slab.
- Column with gears 1. Set to first position small detailso that it is between the blue and yellow gears, and also set in motion the upper half of the picture.
- Column with gears 2. Put in the second position middle detailby connecting it to the green gear.
- Column with gears 3. For the third column you need great detail, which will merge with the previous gear.
- Column with gears 4. Put on the fourth column middle detail.


After that, the image will take its original form and all mechanisms will begin to interact.
Video solution:
The painting was inspired Li Yue harbor.

The ever-moving painting: Li Yue 2

Approach the nearby booth and activate the test, which is a more difficult version of the previous stage. Below are all the actions with surfaces and columns to collect Li Yue's painting 2:
- Surface I. There is no need to interact with the first slab, as it initially has the correct position.
- Surface II. The second surface is also in its original state, so go straight to the next slab.
- Surface III. The third surface is necessary rotate 1 timesso that the green gear is at the top of the square.
- Column with gears 1. Put on the first column great detail - it should connect with the green gear located in the left square.
- Column with gears 2. Set to the second position middle detail, which will set the entire half in motion thanks to the active blue gear.
- Column with gears 3. One more great detail put on the fourth column, which is located in the uppermost empty surface.


After placing the gear, the structure will be restored and take its original form.
If you have any difficulties, you can watch the video guide:
The prototype of the second ever-moving picture - Innshu Inn.

The ever-moving painting: Inazuma 1

Open the main menu of the event, select the desired stage and click on the "Start Challenge" button so that a marker appears on the map that will direct you to Inazumu to the island of Rito.
Move to the central teleport on the island, then go straight and to the left - you will find stands above the stairs. Interact with the first painting to start the mini-game. The following shows the steps to complete the Inazuma painting 1.
- Surface I. Click on the third plate to swap Surface I и Surface III. This will put the empty columns at the bottom and the green gear at the top on the left side of the image.
- Surface II. The blue gear needs to be moved closer to the empty columns. For this rotate the surface 3 times.
- Surface III. The plate is in the correct position, so you can skip the step.
- Column with gears 1. Post middle detailso that it touches the blue gear.
- Column with gears 2. Put more middle detail to the second position - this will set the three lower gears in motion.
- Column with gears 3... Install great detail on the third column so that the lower and right halves of the mechanism begin to interact with each other.
- Column with gears 4. The last position also requires great detail.


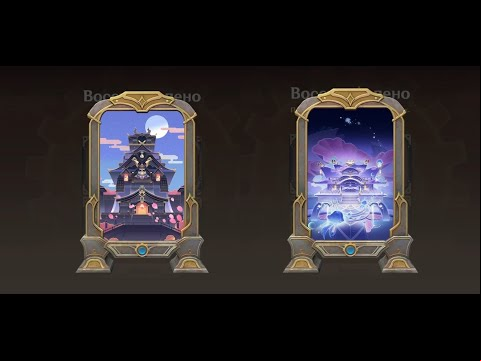
After placing the gear, the picture will be completely restored and will take its original form. Image was inspired by Tensyukaku.
 Video walkthrough of the stage

The ever-moving painting: Inazuma 2

Approach the second stand and start the test. Below you can find out how to move the surfaces and what parts you need to install in order to assemble the Inazuma 2 painting.
- Surface I. Empty columns should be at the bottom of the slab, so you need to rotate surface 1 time.
- Surface II. Do the same - rotate surface 1 timeso that the columns of the top half line up.
- Surface III. This time rotate the surface 2 times. As a result, all empty columns should be in the center of the image.
- Column with gears 1. The position remains without a gear.
- Column with gears 2... Install great detail, which will connect with the green gear.
- Column with gears 3... Put middle detailto activate the entire left half of the painting.
- Column with gears 4. In order for the left and bottom parts to unite, place another middle detail.
- Column with gears 5. Set to the last position great detail.


After that, all the details will begin to move and start the mechanism. Hidden behind the image Sangonomy.
 Video walkthrough of the stage

The ever-moving picture: Sumeru 1
The last stage of the event takes place in the region Sumeru. Go to the location of Port Ormos to the teleport in the east and from there hover to the right. On the road, follow straight ahead to the gear mark until you reach the test site.

Next, we will analyze in detail how to move the surfaces and what parts to install on the columns in order to assemble the picture of Sumeru 1.
- Surface I. Change Surface I и Surface II in some places - a green gear with two empty columns should be at the top of the image. To do this, click on the bottom tile when the arrow appears.
- Surface II. Now the surface with the green gear and two columns must be moved to the lower right corner. Click on the square with the blue detail to change Surface II и Surface III in places.
- Surface III. The plate is in its original state, so nothing needs to be moved.
- Column with gears 1... Install great detailso that it touches the green gear on Surface II.
- Column with gears 2... Put middle detail, which will connect to the green gear located on Surface I.
- Column with gears 3. The position should remain empty, so immediately go to the next step.
- Column with gears 4. The column in the upper right half of the painting needs another middle detail.
- Column with gears 5. Place in the last position great detail.


If all the gears are set correctly, the mechanism will move and unlock the painting. City of Sumeru.

Video guide:

The ever-moving picture: Sumeru 2

Approach the second stand and start the final test - it is not much more difficult than the previous one, but requires more care. To complete the Sumeru 2 painting and claim the remaining rewards, please see the step-by-step puzzle solution.
- Surface I. Swap Surface I и Surface III in some places - the green gear with two columns should move down.
- Surface II. Now, to move the blue gear to the bottom left of the image, swap Surface II и Surface I.
- Surface III. The surface is in its original position.
- Column with gears 1. Post great detailto combine it with the green gear on Surface I.
- Column with gears 2. The column must remain empty.
- Column with gears 3. This position requires middle detail, which will connect to the green gear on Surface III.
- Column with gears 4... Put middle detailso that it sets in motion the entire right side of the mechanism.
- Column with gears 5. Set to the last position great detail.


After placing the last gear, images of a local delicacy will appear − Chicken in tandoor. 
Video guide:
Awards
For completing all stages of the event, the following rewards are issued:
- source stones x240;
- Arctic wolf tooth x6.
- Fragment of the wall of the Decarabin x6.
- Chains of the Lion's Fang x6.
- mercury pill x6.
- Shiny Kamenb Guyun x6.
- A piece of black siderite x6.
- Precious branch of the outer seas x6.
- Other weapon elevation materials from Sumeru, 6 pcs. each species has 3⭐ rarities.
We hope our guide helped restore the paintings in the Ever Moving Painting: Sacred Call event. If you have any questions, please ask them in commentswe will definitely answer them. Read the walkthrough of the other challenges of the event Genshin Impact guides on our website.
Restoring the details of the mechanical picture in Genshin Impact 2.8
Day 1

Approach Felix and select an option "Restore the detail of the mechanical picture".

A menu will open with the available levels and their opening times. Select first level, training will open. It will explain the general rules regarding double-sided gears, overlapping parts, etc.

After reading the in-game guide, a field with gears and rods will open. This level can be called a tutorial, since collecting the first painting in the Ever-Moving Painting event is easy. Below is a simplified version of the video, and then we will show each step in more detail:
To restore the mechanism, play from the blue gear: it is already set in motion. The first eternal picture is going through Lower level, you do not need to switch to the upper one.
To simplify the task, you can use the hint. Click on the button "Check the design of the mechanical picture" upstairs. The system will highlight the required bars and parts.
To restore the details of mechanical painting 1, do the following:
- Set average detail in position 1. It is selected by default.
- Switch to position 2. Put the small detail.
- Activate position 4 and install more detail.
- On the the sixth position put the rest average detail.

The diagram above shows how to restore the painting on the first day.
Step by step solution can be seen in the screenshots below.


Awards

For the first stage of the event, the rewards are as follows:
- 60 primogems;
- 30000 mora;
- 3 lion's fang chains.
Day 2

Available on day 2 second mechanical picture. Open the event menu through Felix and select a level.

A window with a new scheme will appear. Here you will have to change height gears, since it will not be possible to restore the details of the mechanical picture 2 without this.

To change the level, click on the button in the lower left corner. Both levels are shown by default. The gears will be set to the height selected in the display mode.
It is obvious that the central gear twin. The detail on the right refers to top level, and the rest, including the moving gear, to lower.

The hint for the level with the mechanics restoration scheme can be seen above.
The step by step solution looks like this:
- В position 2 insert small gear on lower level. To do this, in the menu at the bottom left, select "View Lower Level" or switch the location via the button "Place on lower level" if necessary.
- В position 3 put average gear on lower level.
- В position 6 set more gear on top level.
- On the 7 position put average detail on top level.

Above you can see ready scheme, demonstrating how to restore the details of the mechanical picture 2.


The screenshots above show the step-by-step process of assembling the parts.
If something remains unclear, you can watch the video:
Awards
For the second picture, the awards are as follows:
- 60 primogems;
- 30000 mora;
- 3 fragment of the Decarabian wall.
Day 3

On the 3rd day, the details of the mechanical picture are as follows.

Here is a new type of gears - bilateral. They are the same size as medium (front side) and small (back side), and also connect parts at different levels.
blue moving gear is located lower level, and green - on the upper. It is to the latter that the path must be paved in order to restore the detail of the mechanical picture.

The tooltip for the level with numbered positions and their details is displayed above.
The step by step solution to the puzzle is as follows:
- В position 3 set small detail on lower level.
- В position 5 put more detail on lower tier.
- В position 7 insert average detail on lower level.
- В position 6 set bilateral detail. She must turn face up automatically. If this does not happen, turn it manually through the button next to the reset.
- В position 4 put average detail on top level.
Parts can be replaced with similar ones, this will not be a mistake.

A ready-made solution to the puzzle for restoring the details of a mechanical picture 3 is indicated above.


In the screenshots you can see the step-by-step assembly of parts.
Solution of the 3rd puzzle in the video:
Awards
For the restoration of the details of the third mechanical painting, the awards are as follows:
- 60 primogems;
- 30000 mora;
- 3 cracked tooth of an arctic wolf.
Day 4

After opening 4 days to restore the mechanical picture, such a scheme will appear.

There is a total 5 free positions. There are 3 pre-installed gears here: blue driving, green final and gray - intermediate, which is needed for laying the route.
Green и blue details are located on lower tier. Central gear - Bilateral, she is facing up.

system prompt and scheme for restoring the details of the mechanical picture 4 displayed above. Need to use slots with 1 on 4, the fifth position remains unused.
The step by step solution to the puzzle is as follows:
- В position 1 insert average gear on lower level.
- В position 2 put average detail on top tier.
- В position 4 set large bilateral (grey) detail face up, as shown in the screenshot, using the button "To turn".
- В position 3 put ordinary (yellow) more detail on lower level.

The finished scheme for restoring the details of mechanical picture 4 is shown above in the picture.


The screenshots show the step-by-step process of installing gears.
Video guide for 4 days of the event:
Awards
For the restoration of a mechanical painting detail, the 4 awards are as follows:
- 60 primogems;
- 30000 mora;
- 3 lion's fang chains.
Day 5
 see diagram fifth puzzles below. This time there are only free slots 5, but there are 8 details. Two of them bilateral. Both pre-installed gears are at the bottom level.

A hint and a ready-made scheme for solving the riddle are shown in the screenshot. The system suggests using all slots except 3.

Step by step, the fifth eternal picture is assembled as follows:
- В position 1 put regular average gear on lower tier.
- В position 2 insert regular large detail on lower level.
- В position 4 set bilateral large gear face up.
- В position 5 put bilateral middle gear face up.
The step by step solution is shown in the screenshots below.


Above you can see the fully assembled chain. If you have any questions, you can also watch the video:
Awards
For ing level 5 you get:
- 60 primogems;
- 30000 mora;
- 3 fragments of the Decarabian wall.
Day 6

Test 6 day - the last, except for the final quest. Its diagram can be found below.

There are 3 gears pre-installed in this level. The one that is blue is the driving one, and the other 2 green ones need to be set in motion.

The scheme is complex: there are 7 free slots, and 8 parts. Two of them are double-sided. All starting gears are located on lower level

According to the system prompt, you need to use 5 free cells: with 3 on 7. You do not need to put parts in positions 1 and 2. Small gears are not used in the puzzle.
Step by step solution to the riddle:
- В position 3 set middle bilateral gear.
- В position 5 put regular average gear on lower level.
- В position 6 insert bilateral large detail and turn her face up.
- В position 7 set simple large gear on lower tier.
- В position 4 put regular average detail on lower level.
Screenshots with a step-by-step solution can be seen below.


If you can't assemble the circuit, check out the completed puzzle solution above. Video walkthrough of the 6th day of the event:
Awards
For the last riddle you will get:
- 60 primogems;
- 30000 mora;
- 3 cracked arctic wolf teeth.
How to assemble a mechanical painting from parts
After solving puzzle 6, a new task will appear in the quest log. For its implementation it is necessary talk to Felix Yogi. He will say that now all the assembled parts need to be combined into one big picture.
Go to the event menu. The final 7 puzzle will open automatically. It is different from previous puzzles. The gameplay of this level is more like jigsaw puzzles: Given the parts of the image to be brought together by placing them in the correct position and rotating them with the button next to the reset.

The set of parts itself is the same, but their position in the menu is individual and changes after each level reset or menu re-entry. For this reason, be more guided by the appearance of each piece of the puzzle and the overall image on the .


Above can be seen step by step restoration process, and below is already displayed finished result. Insert the image pieces into the appropriate slots and rotate them until they take the same position as in the screenshots.

Don't forget to talk to Felix again. As a reward for completing the entire event, you will receive 30 gems, 30000 pestilence, 3 character experience books, and a decor item.
The best site for genshin, everything is detailed, the main thing is highlighted. Sometimes tupits, but it does not interfere much.
Thank you for your , we are pleased! Always happy to help 🙂
The best site!!
Thanks for the ! Always happy to help 🙂
Guys, you are amazing. The best site. Thank you very much
Thanks for the help! Rescued!
Always happy to help!)
Thanks a lot!!! I only use your site. Everything is correct! Thank you!!! The best site!
Thank you for such a review, we are very pleased 🙂 We are always happy to help!) Getting ready for Sumer, so don't lose sight of us, there will be many useful guides
thanks a lot!
Glad to help, the author tried 🙂
best site
Thanks for the ! Happy to try 🙂
not working last day. I rechecked it several times, found it on another resource without jambs. Definitely minus and hrtfu for publishing unverified information
I don’t know how it is on another resource, but with us the author personally goes through everything and screens it. Everything is described and shown step by step, even highlighted in red what to look for. The information is verified by other authors of the site.
Thank you
happy to try)
Thanks a lot. thanks to you I can do everything in 2 minutes
Happy to help)
3 is not correct.
Thanks for the rest.
checked 3rd, all matched. Can you tell me what didn't match? Happy to help
gears are not aligned.
Made through 1 and 2.
Maybe it depends on the server. I did in Europe.
can you tell me how you positioned the gears?
thank you so much, what would I do without you
happy to try) thanks for the warm